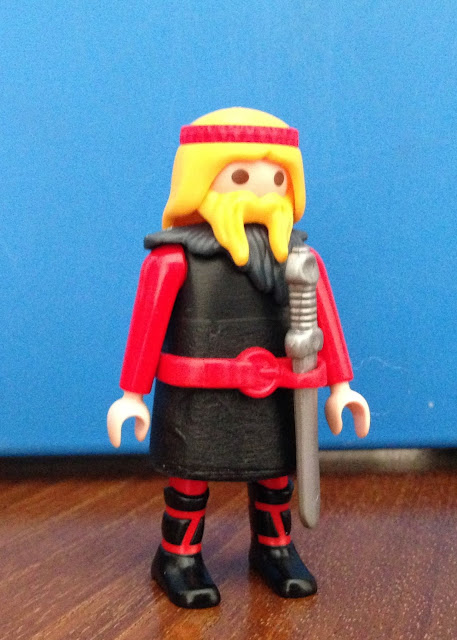
Aquí tenéis otra figura más de
nuestra primera generación de cuerpos personalizados. Ahora le hemos añadido
algún detalle más como el casco cónico que hemos conseguido lijando un casco
original de Playmobil. Esperamos que os guste.
Aprovechando la entrada y la
petición de Miguel, vamos a ampliar con un pequeño tutorial sobre cómo hemos hecho
los cuerpos. Las fotos son pruebas y no son buenas, pero creo que ayudarán porque se ven bastantes fallos.
El material que hemos utilizado
es la cinta de carrocero que se usa para acondicionar las superficies antes de
pintarlas. Es resistente, barata y la hay en varios anchos.
Tomamos un cuerpo y vamos
añadiendo pequeños trozos en la parte interior con el adhesivo hacia afuera
hasta conseguir alargar el cuerpo.
Posteriormente vamos poniendo tira sucesivamente hasta conseguir igualar las superficies. Utilizamos las tijeras para ir nivelando la altura y la forma de la falda. Si queremos añadir textura, se juntan varias tiras y se añaden sobre la superficie. ¡Ojo! Demasiada cinta dentro del cuerpo puede hacer que no entre el esqueleto.
Posteriormente vamos poniendo tira sucesivamente hasta conseguir igualar las superficies. Utilizamos las tijeras para ir nivelando la altura y la forma de la falda. Si queremos añadir textura, se juntan varias tiras y se añaden sobre la superficie. ¡Ojo! Demasiada cinta dentro del cuerpo puede hacer que no entre el esqueleto.
Una vez se han añadido varias
capas, la superficie empieza a tener bastante resistencia y pasa a ser rígida.
Para finalizar, utilizamos lijas finas para alisar y homogeneizar la superficie.
El primero fue un churro, el
segundo otro churro, el tercero empezó a funcionar más o menos… Pero ahora estamos encantados con
los resultados.
-------------------------
Here you have another custom Playmobil figure
of our first generation of personalized bodies. Now we have added some more
details as the conical helmet we have achieved by sanding an original Playmobil
helmet. We hope you like it.
Taking advantage of this post and the request
of Miguel, we will expand it with a small tutorial on how the bodies were made.
The photos are test shots and they are not quite good, but I think they will
help.
We used an adhesive tape that it used to
condition the surfaces before painting. It is tough, cheap and there are
several widths.
We take a body and we are adding small pieces
in the inner part with the adhesive out until you can lengthen the body.
Subsequently we put the strip successively until we can even the surfaces. We
use the scissors to go leveling the height and shape of the skirt. If we want
to add texture, several strips are put together and added on the surface. Watch
out! Too much tape inside the body can prevent it from entering the skeleton.
Once several layers have been added, the
surface begins to have enough resistance and becomes rigid. To finish, we use
fine sandpaper to smooth and homogenize the surface.
The first one was a failure, the second one was another
failure, the third one started to work more or less ... But now we are delighted
with the results.


