Páginas

lunes, 31 de octubre de 2016

PLAYMOBIL CUSTOM – WAR LORD FALCONER


Una figura que teníamos pendiente era el enano halconero que salía en la Película “El señor de la guerra” (1966), que estábamos deseando hacer, y no nos resultaba nada fácil, pero en algún momento hay que dar por definitivo el trabajo.


También os presentamos un artilugio que hemos montado para los halcones con un poco de imaginación y esas piezas tan buenas de los cavernícolas.


Esperamos que os gusten.


--------------------------

We had pending to make a figure about the falconer dwarf who appeared in “the War Lord” (1966), that we were wishing to try, and it was not easy, but we decided that we finished it.

We also present a customized piece that we have assembled with a little imagination and these so-good parts of the cavemen.

We hope you like it.

lunes, 24 de octubre de 2016

PLAYMOBIL DIORAMA - MOTTE & BAILEY CASTLE


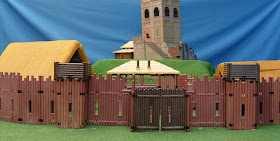
Llevaba ya bastante tiempo rondando la idea de este tipo de construcción y no ha sido hasta ahora que nos hemos atrevido con ella, aunque con un resultado bastante pobre. Este tipo de fortificación se puede considerar posterior a la era vikinga, al menos en Inglaterra, ya que fueron los normandos los que las introdujeron en las islas y son el origen de muchos de los castillos que hoy se levantan en Europa. El sistema es sencillo, se construye un montículo sobre el que se asienta la casa fortaleza del señor. En la ladera del montículo crece la hierba y se conecta sobre un patio en el que se encuentran los “servicios” (herrería, almacén, granero….). Si se puede, se hace un foso alrededor del mismo para dificultar el trabajo a cualquier atacante.


Aunque hemos intentado hacer el mínimo, el tamaño importa y mucho. Un castillo de estas características a escala 1/25 que no quede ridículo necesita más de 4 metros cuadrados de superficie y aun así da problemas y se nos sale del encuadre de la cámara.


Hemos optado por la empalizada del fuerte antiguo de Playmobil que puede tomar forma circular. El foso no lo hemos ni intentado. La torre es la misma que la del diorama anterior, añadiendo algunos elementos extra para cambiarle un poco el aspecto y mezclando con otros elementos de Playmobil. Está colocada sobre una caja de cartón vacía para poder hacer la colina.


También aquí Crisagón de la Cruz se ha tenido que hacer cargo de la construcción de esta fortificación y aunque la empresa no haya sido excesivamente exitosa ha dejado una guarnición para su defensa.


En nuestra opinión hemos fracasado y no hemos podido sacarle el partido que se merece. No siempre se puede ganar.  ¿Qué os parece?

-------------------------

We had been quite some time hanging around the idea of this type of construction and now we have dared with it, but we got a poor result. This type of fortification can not be considered of the Viking era, at least in England, the Normans were who introduced them in the islands and they are the origin of many of the castles in Europe. The system is simple, a hill  is constructed to put a tower. On the slope of the mound grass grows and connects on a courtyard  where all the castle "services" are (blacksmith, warehouse, barn ....). If you can, a moat is done to make difficult the job to any attacker.

Although we have tried to do the minimum, size matters a lot. A castle of these in 1/25 scale that it is not ridiculous needs more than 4 square meters and still gives us problems and leaves the frame of the camera.

We opted for the palisade of old fort of Playmobil, because you can get a circular shape. We did not have tried the moat. The tower is the same as the previous diorama, adding additional elements to change some slightly appearance and mixing with other elements Playmobil. It is placed on an empty cardboard box to make the hill.

Also here Crisagón has had to take charge of the construction of this fortification and although He was not successful has left a garrison for its defense.

In our opinion we have failed. You can not always win. What do you think?

lunes, 17 de octubre de 2016

PLAYMOBIL DIORAMA - THE WAR LORD ARRIVES


Os presentamos un diorama continuación del anterior de los monjes. Utilizando los mismos elementos hemos intentando representar la residencia de un señor de la guerra en la Europa medieval del siglo XI. 


En este caso, nos permitimos la licencia de asignar una nueva aventura a Crisagón de la Cruz, que tras volver a rendir cuentas al Duque y enviar a su esposa a vivir con los frisios, se ha tenido que encargar de la custodia de estas tierras para volver a caer en gracia como caballero normando.


Hemos incluido los elementos que teníamos en el diorama anterior y añadido una torre personalizada de Steck, con alguna modificación sobre la que ya había presentado Neperiano, y sobre la que no hemos podido hacer ninguna aportación relevante. Le hemos puesto el tejado porque queríamos darle un aspecto de edificio romano reutilizado.


También le hemos incorporado un río y el puente que ya teníamos, que hemos repintado en el mismo tono que nuestras rocas. Aunque no son elementos de Playmobil nos ayudan mucho en nuestras aventuras y personalizaciones.


En general nos gusta el resultado y creemos que hemos acertado en alguna cosa, pero se nos va un poco de dimensiones. La escala 1/25 es demasiado exigente para nosotros y nos deja algunos huecos que no nos acaba de convencer. Como bien podréis comprobar en nuestra siguiente entrada de dioramas.


¿Qué os parece?

--------------------------------------

Here we introduce to you a new diorama following of our previous diorama about the monks. Using the same elements we have tried to represent the residence of a War Lord in medieval Europe the eleventh century. In this case we allow the license to assign a new adventure for Crisagón, who after have paid back their duties to his Duke and send his wife to live with the Frisians, has had to take charge of the custody of this land to return to ingratiate as War Lord.

We have included some  elements we had in the previous diorama and added a custom Steck tower, with some modification on which he had already submitted Neperiano, and on which we were unable to make any significant contribution. We've put the roof because we wanted to give it a look of Roman building reused.

We have also incorporated a river and the foam custom bridge that we had, we repainted in the same tone as our rocks. Although they are not Playmobil elements help us a lot in our adventures and customizations.

We like the result and we believe that we were do some good things, but the 1/25 scale is too demanding for us and leave us some gaps that we just not convincing. As well you can see in our next entry dioramas.


What do you think?

miércoles, 12 de octubre de 2016

PLAYMOBIL CUSTOM – HILL DWARVES

Enanos de las montañas. Con los enanos nos pasa un poco como con los vikingos. Nos encantan. Cada vez que hay piezas por casa, no nos podemos resistir. Son un vicio. Nunca pensé que Playmobil llegaría a sacarlos, pero ahora me doy cuenta de la suerte que hemos tenido con su aparición. Tanto en civiles como en militares, tienen muchas posibilidades. Mi hijo mayor es más crítico y siempre nos dice que en realidad hacemos mini piratas, mini vikingos, mini… Puede ser que sea así, pero qué bien nos lo pasamos.


Como siempre, después de un tiempo, le empezamos a ver las posibilidades a los originales que ha sacado Playmobil, y es ahora, con alguna modificación, que os presentamos a nuestra pequeña tropa de enanos de las montañas. Hemos tomado como referencia al enano gordo de la caja del Troll (6004) y lo hemos combinando con tonos antracita. Bien acorazado para la lucha cuerpo a cuerpo. Esperamos que os gusten.

--------------------------

Hill Dwarves. We love the Playmobil dwarves.  As the Vikings whenever there pieces at home, we could not resist. They are a vice. I never thought that Playmobil made  them out, but now I realize how lucky we have had with their production. Both civilian and military, they have many possibilities. My oldest son is more critical and often tells us we actually do little pirates, little Vikings, little ... it might be so, but what a good time we had.

As always, after a while, we begin to see the possibilities that has brought the original Playmobil, and now, with some modification, we present our small troop of dwarves of the mountains. We have taken as a reference to fat dwarf  (6004) and we have combined with anthracite piezas. Well battleship for the melee. We hope you like


martes, 4 de octubre de 2016

REVIEW – PLAYMOLOOK

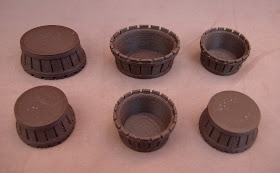
Seguimos profundizando en el tema de la impresión 3D. Hace algunos días descubrimos en Ebay un sitio que ofrecía piezas compatibles con Playmobil. Las piezas no eran exactamente de la temática que nosotros estábamos buscando, salvo por unos cestos que nos llamaron mucho la atención. Tenemos que decir que había otros elementos con una pinta estupenda.


Se ofrecían 6 cestos por 6 euros y 0,80 de gastos de envío. Además las piezas estaban impresas en marrón oscuro, por lo que no necesitan pintarse. Como no era demasiado dinero y  teniendo en cuenta que nos gusta investigar, los acabamos pidiendo. Los encargamos un lunes y el jueves ya los teníamos en casa, todo perfecto.


Os ponemos unas fotos para que podáis comprobar la calidad del producto comparado con otros elementos originales y así comparar. 

También os dejamos otros elementos que se venden y nos han dejado absolutamente maravillados:


Nuestra sorpresa no acaba allí, como somos inquietos nos pusimos en contacto para preguntar algunas cosillas y nos encontramos con una artista, Yolanda, que nos atendió estupendamente y nos ha enseñado en un momento un montón de alternativas y posibilidades para nuestras creaciones. Nuestra amiga tiene un blog propio en el que enseña sus creaciones: PLAYMOLOOK, y que desde aquí, os recomendamos efusivamente. Nos ha descubierto un nuevo material, el Jumping Clay, que se nos antoja lleno de posibilidades para nuestras creaciones y del que tendremos necesariamente que hacer alguna entrada monográfica.

Os ponemos también algunas muestras.


Nosotros ya estamos deseando probarlo con algunas ideas que tenemos para hacer algunos accesorios para nuestras figuras.

¿Qué os parece?

Podéis encontrar más información en los siguientes sitios.

Blog 


---------------------

We continue to deepen the topic of 3D printing. A few days ago we found on Ebay a site that offered compatible parts with Playmobil. The pieces were not exactly the subject that we were looking for, except for some buckets that called our attention. We also must say that there were other elements looked great.

Six buckets cost 6 euro plus shipping. The pieces were printed in dark brown, so they do not need painting. As it was not too much money and we consider that we like to investigate, so we bought it. They was bought on Monday and on Thursday they arrived at home, all perfect.
We put some pictures so you can check the quality of the product compared to other original Playmobil original parts.

I also left other items that are sold and that have left us absolutely amazed:

Our surprise does not end there, as we are anxious we got in touch to ask some things and we found an artist: Yolanda, who treated us wonderfully and has taught us a lot of alternatives and possibilities for our creations. She has a blog that teaches herself in her creations: PLAYMOLOOK, a place that we recommend stongly. She has discovered a new material to us, Jumping Clay, which seems to us full of possibilities for our creations and we'll have to do necessarily some monographic post.

I also post some samples.

We are already looking forward to try some ideas we have to make some accessories for our figures.

What do you think?


You can find more information at the following sites.

Blog 


sábado, 1 de octubre de 2016

REVIEW – HOW TO DISASSEMBLE YOUR PLAYMOBIL FIGURES.

Aquí tenéis la entrada prometida, para no tener un accidente con vuestras figuras personalizadas. Empezamos por el principio: / Here is the promised post, to not have an accident with your custom figures. We start from the beginning:

Materiales. / Materials.


Gomas normales de bazar (muchas), paño viejo grueso tipo toalla, un cascanueces y unos alicates (opcional, solamente para casos extremos).
Many many rubbers bands, an old cloth, a nutcracker and the pliers (for extreme cases only).

Método: / Method.  
       
La goma: Se enrosca la goma alrededor del cuello de la figura (le quitamos el pelo). Tiene que quedar tensa sin partirse. La goma hará fuerza hacia fuera y con un giro de muñeca la cabeza saldrá despedida.
Rubber band: The rubber band was wrapped (strongly) around the neck of the figure (we remove the hair). It must be wrapped without breaking. The rubber band will force out and with a flick of the wrist will bounce head.


Que no sale: le apretamos otra goma fuertemente y volvemos a probar. A veces las figuras tienen en el cuello alguna pieza (cota de malla, coraza) que dificulta el giro de la cabeza… paciencia, hay que dejar a las gomas actuar un par de minutos. 
It does not work: We press it with another rubber band strongly and re-test. Sometimes the figures have some piece neck (chainmail, armor) which makes the head do not go out ... patience, leave the rubber band works for a couple of minutes.


Que sigue sin salir: Liamos el trapo a la cabeza de la figura (para no rayar la cabeza) y apretamos girando lentamente con el cascanueces para no dañar la pieza. Si en este punto la cabeza no ha salido, no es un Playmobil,  ¡Es un GI-JOE!
Still with problems: Roll the cloth to the head of the figure (not to scratch the head) and pressed slowly turning him with nutcracker (taking care that not to damage the piece). If at this point the head has not come out, it is not a Playmobil, it is a GI-JOE!


Por último, aunque nosotros no lo utilizamos está el método de los alicates: Se sujeta la cabeza por detrás con los alicates (para no dañar la cara) y tiramos de ella. No suele fallar, pero prefiero el método anterior porque es menos agresivo y requiere menos fuerza física.
Finally, although we did not use it, you can use the pliers method: Attaches head from behind with the pliers (to avoid damaging the face) and pull it. Not usually fail, but I prefer the previous method because it is less invasive and requires less physical strength.